Validation을 이용해 검증하기
일반적인 웹 요청에서 검증은 클라이언트단과 서버단으로 나뉜다.
클라이언트단에서 요청 파라미터를 검증하면 사용자의 사용성에 장점이 있지만, 어떤 요청이 들어올 지 모르기 때문에 서버단에서도 파라미터에 대한 검증이 꼭 필요하다.
Spring은 이러한 검증을 지원한다. 이를 알아보자.
BindingResult
BindingResult는 스프링이 제공하는 검증 오류 처리방법중 하나이다.
public String addItem(
        @ModelAttribute Item item, BindingResult bindingResult,
        RedirectAttributes redirectAttributes,
        Model model
) {
    ...
}
위와 같이 @ModelAttribute 어노테이션이 붙은 객체 뒤에 BindingResult를 위치하면 bindingResult는 item에 대한 검증 내용을 담게 된다.
스프링에서 사전 검증하는 정보
이렇게 설정해 둔 bindingResult에는 요청에 포함된 item에 대한 사전 검증 결과가 담기는데 이 내용은 다음과 같다.
// 파라미터로 넘어온 값의 type이 일치하지 않는 경우

org.springframework.validation.BeanPropertyBindingResult: 2 errors
Field error in object 'item' on field 'price': rejected value [aa]; codes [typeMismatch.item.price,typeMismatch.price,typeMismatch.java.lang.Integer,typeMismatch]; arguments [org.springframework.context.support.DefaultMessageSourceResolvable: codes [item.price,price]; arguments []; default message [price]]; default message [Failed to convert property value of type 'java.lang.String' to required type 'java.lang.Integer' for property 'price'; nested exception is java.lang.NumberFormatException: For input string: "aa"]
Field error in object 'item' on field 'quantity': rejected value [aa]; codes [typeMismatch.item.quantity,typeMismatch.quantity,typeMismatch.java.lang.Integer,typeMismatch]; arguments [org.springframework.context.support.DefaultMessageSourceResolvable: codes [item.quantity,quantity]; arguments []; default message [quantity]]; default message [Failed to convert property value of type 'java.lang.String' to required type 'java.lang.Integer' for property 'quantity'; nested exception is java.lang.NumberFormatException: For input string: "aa"]
위 메세지에서 잘 봐야 하는 부분은 typeMismatch.item.price,typeMismatch.price,typeMismatch.java.lang.Integer,typeMismatch이다.
price에 대한 타입이 일치하지 않는다는 메세지와 함께 typeMismatch.item.price,typeMismatch.price,typeMismatch.java.lang.Integer,typeMismatch에 대한 오류 메세지가 존재하지 않기 때문에 스프링에서 지정한 default message인 Failed to convert property value of type 'java.lang.String' to required type 'java.lang.Integer' for property 'price'; nested exception is java.lang.NumberFormatException: For input string: "aa"를 bindingResult의 price에 대한 오류메세지로 추가한다.
사용자가 검증 후에 추가할 에러 메세지
스프링에서 사전 검증해준 error메세지 외에 서버에서 값에 대한 정책에 의한 검증 후 오류 메세지를 추가할 때에는 다음과 같이 추가한다.
// bindingResult에 item 객체의 itemName에 대한 오류 메세지를 추가
bindingResult.addError(
    new FieldError("item", "itemName", "상품 이름은 필수입니다.")
    );

// item객체 내의 필드에 대한 오류 검증이 아닌 item 객체 자체에 오류 메세지 추가
bindingResult.addError(
    new ObjectError("item", "가격 * 수량의 합은 10,000원 이상이어야 합니다. 현재 값 = " + resultPrice)
    );
위 코드는 bindingResult에 item 객체의 itemName에 대한 오류 메세지를 추가하는 내용이다.
정말 간단하다. addError하여 new FieldError에 세가지 파라미터를 넣어준다.
한가지 추가적인 개선을 해보자. new FieldError은 두가지 생성자가 있다.

우리는 첫 번째 방법을 사용했었다.
이 방법은 한가지 단점이 있는데 바로 사용자가 입력한 기존 값에 대한 정보를 잃는다는 것이다.
이를 해결하기 위해 아래의 방법으로 코드를 수정하자.
bindingResult.addError(
    new FieldError("item", "itemName", item.getItemName(), false, null, null, "상품 이름은 필수입니다.")
);item.getItemname()을 추가하여 기존 입력된 값을 입력한다.
이로써 error과 함께 사용자의 입력값을 보존할 수 있다.
하지만 위 방법의 단점은 상품 이름은 필수입니다.라는 에러 메세지를 모두 직접 입력해야 한다는 것이다.
만약 item.itemName에 대한 검증이 100개의 컨트롤러에서 진행된다면? 해당 메세지를 모두 직접 변경해주어야한다.
message를 이용해 일괄적으로 메세지를 처리하자.
먼저 FieldError의 파라미터는 다음과 같이 존재한다.
objectName: 오류가 발생한 객체 이름field: 오류 필드rejectValue: 사용자가 입력한 값(거절한 값)bindingFailure: 타입 오류 같은 바인딩 실패인지, 검증실패인지 검증 값codes: 메세지 코드arguments: 메시지에서 사용하는 인자defaultMessge: 기본 오류 메세지
위에서 진행하였던 FieldError의 파라미터를 살펴보자.
bindingResult.addError(
    new FieldError("item", "itemName", item.getItemName(), false, null, null, "상품 이름은 필수입니다.")
    );
bindingFailure, codes, arguments에 대해 false, null, null로 입력하였다.
codes와 arguments를 이용한다면 message를 이용해 일괄적인 처리가 가능하다.
# errors.properties

required.item.itemName=상품 이름은 필수입니다.
range.item.price=가격은 {0} ~ {1} 까지 허용합니다.
max.item.quantity=수량은 최대 {0} 까지 허용합니다.
totalPriceMin=가격 * 수량의 합은 {0}원 이상이어야 합니다. 현재 값 = {1}

# application.properties

spring.messages.basename=messages,errors
위처럼 errors.properties에서 에러 메세지에 대해 정의해두고, application.properties에 errors.properties를 메세지로 읽도록 설정해두자.
그리고 기존 코드를 다음과 같이 수정하자.
bindingResult.addError(
    new FieldError("item", "itemName", item.getItemName(), false, new String[]{"required.item.itemName"}, null, null)
    );

bindingResult.addError(
    new FieldError("item", "price", item.getPrice(), false, new String[]{"range.item.price"}, new Object[]{1000, 1000000}, null)
    );
codes는 errors.properties에서 정의한 메세지의 키를 String 배열 형태로 넘겨주고, arguments에는 메세지의 {0}, {1}과 같이 입력한 부분에 넣어줄 값들을 Object 배열로 넘겨준다.
이렇게 설정하면? 마지막 인자인 default message를 넘겨주지 않더라도 스프링에서 메세지를 찾고, 인자를 넣어 에러메세지를 생성해준다.
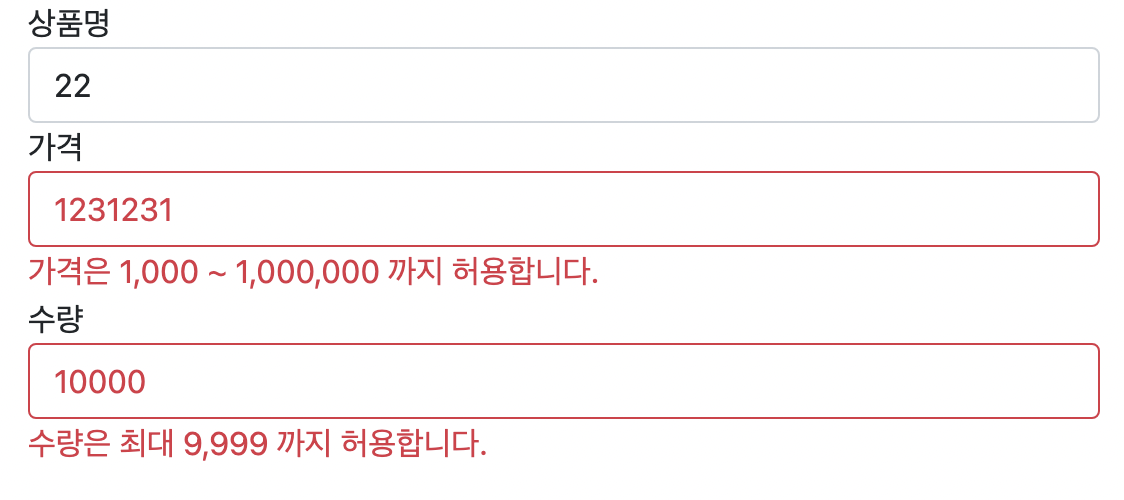
Field error in object 'item' on field 'price': rejected value [1231231]; codes [range.item.price]; arguments [1000,1000000]; default message [null]
Field error in object 'item' on field 'quantity': rejected value [10000]; codes [max.item.quantity]; arguments [9999]; default message [null]
rejectValue, reject 사용으로 개선하기
다시 이전 방식의 코드를 보자.
bindingResult.addError(
    new FieldError("item", "itemName", item.getItemName(), false, new String[]{"required.item.itemName"}, null, null)
    );
분명히 불필요한 값이 있다.
바로 item이라는 값이다.
bindingResult는 검증할 객체 바로 뒤에 오기 때문에 내가 검증할 이름을 알고있다.
bindingResult.getObjectName() -> item
위와 같이 굳이 값을 알고있지만 입력하는 불필요한 값을 rejectValue와 reject를 이용해 제거해보자.
bindingResult.rejectValue("itemName", "required");

bindingResult.rejectValue(
    "price", "range", new Object[]{1000, 1000000}, null
    );

bindingResult.reject(
    "totalPriceMin", new Object[]{10000, resultPrice}, null
    );
기존 코드와 동작은 동일하다.
위와 같이 설정한다면 "required"로 시작하는 메세지 중 객체의 이름인 "item"의 "itemName"에 대한 메세지를 찾게 된다.
따라서 required.item.itemName의 메세지를 추가하게 된다.
reject()메서드의 경우 global error을 처리하기 때문에 단순하게 totalPriceMin메세지를 찾는다.
MessageCodesResolver
MessageCodesResolver은 검증 오류 코드로 메시지 코드들을 생성한다.
그리고 DefaultmessageCodesResolver를 기본 구현체로 사용한다.
객체 오류
객체 오류의 경우 DefaultMessageCodesResolver은
- code + "." + object name
- code
의 순서로 오류코드를 찾는다. (우선순위)
필드 오류
필드 오류의 경우 DefaultMessageCodesResolver은
- code + "." + object name + "." + field
- code + "." + field
- code + "." + field type
- code
의 순서로 오류코드를 찾는다.
MessageCodesResolver를 통해 오류가 발생하였을 때, 위 우선순위로 message에서 찾게 된다.
검증로직을 분리하자. Vlidator
모든 컨트롤러에서 검증 로직을 추가하는 것은 코드의 반복을 뜻하게 된다.
이러한 반복되는 코드를 제거해보자.
ItemValidator 생성
@Component
public class ItemValidator implements Validator {
    @Override
    public boolean supports(Class<?> clazz) {
        return Item.class.isAssignableFrom(clazz);
        // item == clazz
        // item == subItem
    }

    @Override
    public void validate(Object target, Errors errors) {
        Item item = (Item) target;
        //검증 로직
        ValidationUtils.rejectIfEmptyOrWhitespace(errors, "itemName", "required");

        /*
        if (!StringUtils.hasText(item.getItemName())) {
            bindingResult.rejectValue("itemName", "required");
        }
        */

        if (item.getPrice() == null || item.getPrice() < 1000 || item.getPrice() > 1000000) {
            errors.rejectValue("price", "range", new Object[]{1000, 1000000}, null);
        }
        if (item.getQuantity() == null || item.getQuantity() >= 9999) {
            errors.rejectValue("quantity", "max", new Object[]{9999}, null);
        }

        //특정 필드가 아닌 복합 룰 검증
        if (item.getPrice() != null && item.getQuantity() != null) {
            int resultPrice = item.getPrice() * item.getQuantity();
            if (resultPrice < 10000) {
                errors.reject("totalPriceMin", new Object[]{10000, resultPrice}, null);
            }
        }

    }
}
Validator 인터페이스를 구현하는 구현체인 ItemValidator를 생성하고, Bean으로 등록하였다.
Bean 등록은 필수적이지 않다.
supports메서드는 검증할 클래스가 일치하는지 확인한다.
validate메서드는 검증로직을 담고 있다.
컨트롤러에서 검증설정
private final ItemValidator itemValidator;

@InitBinder
public void init(WebDataBinder webDataBinder) {
    webDataBinder.addValidators(itemValidator);
}

...

public String addItemV5(
        @ModelAttribute Item item, BindingResult bindingResult,
        RedirectAttributes redirectAttributes,
        Model model
) {
    itemValidator.validate(item, bindingResult);

    ...
}
위와 같이 컨트롤러에서 @InitBinder어노테이션을 이용한 init 메서드를 작성하고, itemValidator의 validate를 이용해 검증할 수 있다.
조금만 더 쉽게 설정하자. @Validated
어차피 itemValidator.validate();를 반복해서 각 requestMapping에 작성한다면?
이또한 줄일 수 있다.
public String addItemV6(
        @Validated @ModelAttribute Item item, BindingResult bindingResult,
        RedirectAttributes redirectAttributes,
        Model model
) {
    ...
}
위와 같이 검증할 객체 앞에 @Validated 어노테이션을 사용하면 내부적으로 supports메서드를 사용해 검증이 가능한 클래스인지 확인한 후 validate메서드로 바로 뒤에 있는 bindingResult에 검증 결과값을 넣어준다.
객체별 검증 어노테이션으로 설정하기
지금까지는 Validator를 직접 설정해 사용하였다.
이러한 불편함을 해소하기 위해 객체별로 검증 설정을 따로 둘 수 있다.
// build.gradle
implementation 'org.springframework.boot:spring-boot-starter-validation'

// null이거나 공백일 경우
@NotBlank
private String itemName;
검증 어노테이션 문서에서 다양한 검증을 위한 어노테이션을 확인할 수 있다.
위와 같이 검증을 필요로 하는 필드에 어노테이션 처리를 한 후, 기존의 ItemValidator와 같은 Validator를 제거하면 스프링이 자동으로 검증과정을 추가해준다.
마침
검증에 대해 항상 필요에 따라서만 model에 메세지를 넣어줄 생각을 했지 이렇게 프레임워크에서 지원하는 검증을 사용할 생각을 못해본 것 같다.
스프링의 검증은 누구나 읽고 이해하기 쉬운 코드를 작성하는 하나의 방법이라고 생각했다.
'Java & Kotlin > Spring' 카테고리의 다른 글
| [Spring] kotlin + Spring 시작하기 (0) | 2022.08.10 |
|---|---|
| [Spring] SpringBoot 기본 TimeZone 설정하기 (0) | 2022.06.13 |
| [Spring] UnmarshallingFailureException 에러 해결하기 (0) | 2022.06.06 |
| [Spring] IDE에서 잘 접근되던 페이지가 서버에서는 접속되지 않을 때 (0) | 2022.04.30 |
| [Spring] 파일첨부 (0) | 2021.05.28 |
| [Spring] 트랜잭션 (0) | 2021.05.26 |

